Meteora splits the price axis into a row of small boxes called bins. You choose which boxes to put money in, and how much goes in each one.
That sounds like a settings screen. It is really three decisions that shape how the position behaves: which bin width to accept, how many bins to fund, and how to spread money across them.
By the end you will be able to make all three on purpose, read what the fee rate does in a fast market, and decide when moving a position is worth it. For the tick-based concentrated pools on the same chain, see Raydium Liquidity Pools.
Key point: The bin step decides how coarse your position is, and you accept it when you pick a pool. A step much finer than the pair’s usual move between trades means every swap crosses many bins. A step far coarser gives up the depth you came for. Start from what the pair actually does, not from a yield target.
What the bins actually change
Each bin quotes exactly one price. A trade small enough to fit inside one bin executes with no price movement at all. Price moves only when a trade empties a bin and steps to the next one[1].
Inside each bin the pool keeps an invariant — a rule that stays true whatever trades pass through. Here the rule is constant-sum, which is why a trade that fits within a bin moves the price not at all[2]. Between bins, prices grow by a fixed percentage.
Where:
- is the price quoted by bin number .
- is the price of the bin you count from.
- is the bin step, the fixed percentage gap between one bin and the next.
With a step of 25 basis points, each bin sits 0.25% above the one below it[2]. Two consequences follow, and both matter for strategy.
Only the bins that trade earn. A swap pays fees to the bins it trades through, split among the liquidity in each one[2]. Money in bins that price never visits earns nothing. The grid makes that idle money visible bin by bin, rather than hiding it behind a single in-range light.
Crossing a bin changes what you hold. As price climbs through your bins, each one is emptied of the token you are pricing and filled with the quote token. That is divergence loss, also called impermanent loss — the gap between what the position is worth and what simply holding the two tokens would be worth — taken in steps rather than smoothly[4]. See The Impermanent Loss Formula and Concentrated Liquidity Explained.
How wide should each bin be?
The bin step sets the resolution of your position. The question to answer is simple: how far does this pair usually travel between the trades that reach you?
| Bin step | Gap per bin | Usually suits | If it is mismatched |
|---|---|---|---|
| 1 bp | 0.01% | Pegged pairs, liquid-staking tokens against SOL | On a pair that moves, any real trade crosses bins in bulk |
| 4 to 10 bp | 0.04% to 0.10% | The deepest majors, such as SOL/USDC | You need many bins to cover a normal day |
| 20 to 25 bp | 0.20% to 0.25% | Liquid volatile tokens | Coarser than a deep major needs |
| 80 to 100 bp | 0.80% to 1.00% | Higher-volatility tokens | Large jumps between bins and wide spreads |
| 200 bp and up | 2.00% and up | New listings and the thin long tail | Close to a few big flat steps |
A workable rule is to pick a step near the pair’s typical move between the trades that actually reach your bins. On a pair trading every few seconds that move is small. On a thin pair with minutes between swaps it is much larger, and a fine grid there just means each trade sweeps a dozen bins.
Meteora fixes the bin step and the fee settings when a pool is created, and steps can go up to 400 basis points[1][2]. Several pools can exist for the same pair with different steps. So your real decision is which existing pool to join, and the table above is a screening tool for that.
Why your fee rate is not the number on the label
The fee on a Meteora swap is a base rate plus a variable part. The variable part comes from a counter of how far price has moved across bins recently, which decays when trading goes quiet. Fast movement raises the counter, and the counter raises the fee, up to a hard cap of 10%[2].
Where:
- is what a trader actually pays on the swap.
- is the pool’s floor rate, set from the bin step and a base factor.
- is the volatility accumulator, the count of recent bin crossings.
The design charges more exactly when the pool’s quote is most likely to be out of date. That is when traders who already know the new price take the most from you. Being picked off that way is adverse selection, meaning you keep trading with people who know something you do not.
Researchers measure that cost as loss-versus-rebalancing (LVR): what the pool gives up compared with making the same trades at market prices[5]. A higher fee scales it down, and so do faster blocks and cheaper transactions, which helps on Solana[6]. Nothing removes it.
The practical consequence is about measurement. A fee rate sampled in a calm week understates what the position earns in a volatile one, and also what it gives up. Judging a pool from one quiet window is a common mistake. See Dynamic Fees in AMMs.
You also do not keep the whole fee. Meteora’s documentation lists a 10% protocol share on standard pools and 20% on launch pools, and older pools can carry a different share, so read it from the pool itself[2].
Which shape should you spread money in?
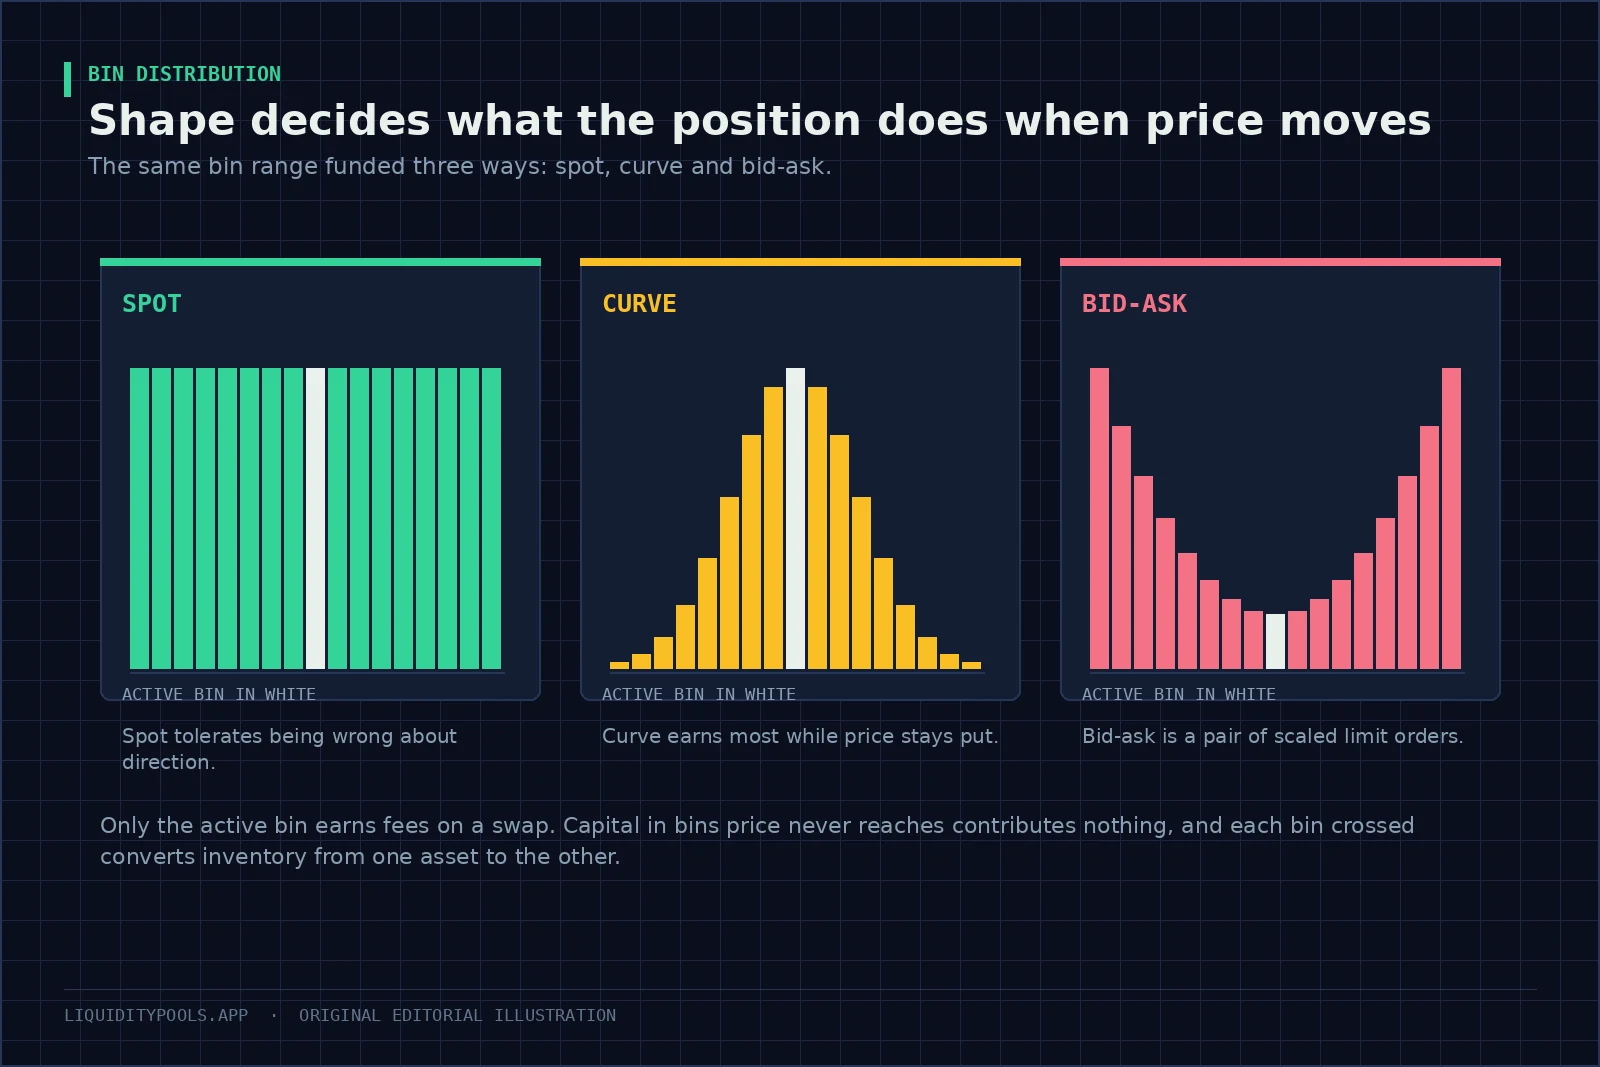
Meteora gives you three ways to distribute money across the bins you fund[1][4].
Spot puts the same amount in every bin you select. It is the neutral choice when you have no view on where price will sit, and it fails gracefully. If price runs to the edge of your range, you still had money working the whole way there. Use it as the default for a pair you plan to hold through movement.
Curve piles weight around the current price and thins toward the edges. It earns the most while price stays near where you deposited, and it goes out of range sooner when price moves. It suits range-bound pairs and short holding periods where you will be watching[4].
Bid-ask puts weight in the outer bins and little in the middle. This is not passive market making. It is a pair of scaled limit orders: sell into strength above, buy into weakness below. Treat it as an execution tool and size it like a trade, not like an allocation. See Range Orders on AMMs.
| Shape | Fees while price sits still | What a trend does to it | Read it as |
|---|---|---|---|
| Spot | Moderate | Even conversion across the move | Passive market making |
| Curve | High | Fast conversion, then idle money at the edge | An active, range-bound view |
| Bid-ask | Low near the middle | Fills at the edges, as intended | Scaled limit orders |
A position covers one continuous run of bins: 70 by default, and up to 1,400 if you widen it. You can resize it later without closing it[3].
A position, worked all the way through
Take $12,000 into a volatile token quoted in USDC, at a price of $100. You join a pool with a 25 bp bin step and fund 60 bins, 30 on each side, which covers about $92.80 to $107.80. You use the spot shape and hold for 30 days.
The pool’s base fee is 0.25%, and it keeps 10% of trading fees for the protocol. The token finishes the month 5.8% lower, at about $94.20.
| Line | Value |
|---|---|
| Base fee | 0.25% |
| Average fee actually charged, variable part included | 0.34% |
| Volume traded through the bins you funded | $2,900,000 |
| Your share of the liquidity in those bins | 4.1% |
| Your fee income, after the 10% protocol share | $364 |
| Share of the month price spent inside your range | 72% |
| Shortfall against holding at month end | -$138 |
| Transaction fees, 14 operations | -$3 |
| Net against holding the original deposit | +$223 |
| Annualised | 22.6% |
Two things here generalise.
First, the variable fee added about 36% on top of the base rate in a month of ordinary movement. That is why you cannot read the base rate as your income.
Second, the result leans heavily on where the price ends. Had the token finished 8.6% lower, below your range, the shortfall would be $304 and the month would net about $57. The fees were the same; the price path was not.
Transaction costs were three dollars. That reverses the gas arithmetic that dominates small positions on expensive chains, covered in LP Gas Costs. Cheap operations make frequent adjustment possible here, which is a real advantage, and also a temptation.
Rebalancing rules that survive a fast market
Cheap transactions tempt you into over-managing. The trigger still has to be economic. Studies of concentrated positions find that the bigger returns come only with more risk and more active management, and results vary widely[7].
- Move on a fee forecast, not on price. Re-centre only when expected fees in the new range over your remaining horizon beat the shortfall you lock in by moving, plus the cost of moving. If that does not hold, leave the position alone, even at the edge.
- Do not chase a trend bin by bin. Re-centring again and again into a directional move locks in the conversion at every step. It is the fastest way to turn a paper shortfall into a real one.
- Widen after volatility rises. The instinct after being knocked out of range is to re-centre tightly and win the yield back. What just happened argues for the opposite. Meteora lets you add bins to either side of an open position[3].
- Treat claiming as a separate decision. On Meteora, fees and rewards do not compound into your liquidity. They wait in the position until you claim them, so collecting them does not mean touching the bins[3].
- Check the pool still gets the volume you planned around. Trading on Solana moves quickly between venues, and a well-shaped position in a pool that stopped receiving trades earns nothing.
The general framework behind the first rule is in Concentrated Liquidity Strategy.
What to check before you deposit
- The bin step against the pair’s typical move between trades, using the table above.
- The base fee, the variable fee settings and the protocol share for that specific pool, read from pool data rather than assumed.
- Thirty days of volume, and whether it reached the band of bins you plan to fund.
- How much money already sits in those bins. That is your dilution, not the pool’s headline total.
- How much the pair moves, and what share of the last thirty days price spent inside your proposed band.
- Your shape, chosen deliberately, with spot as the default unless you hold a specific view.
- Program risk. Find out who can upgrade the program and change its settings. DeFi systems that look decentralised often keep that power with a small group[8]. See Liquidity Pool Risks and How to Evaluate a Liquidity Pool; both apply unchanged on Solana.
Bins change the resolution of the decision. They do not change the decision itself: whether your fee income over your horizon beats what the pricing rule does to your tokens along the way.
Where to go next
Rebuild the worked example in the Meteora DLMM calculator, then change the end bin to see how fast the result moves. The impermanent loss calculator gives a continuous-range check on the same numbers. For the mechanism underneath, read DLMM Explained.
References
- What is DLMM? (Meteora Documentation)
- DLMM Formulas (Meteora Documentation)
- DLMM Dynamic Positions (Meteora Documentation)
- DLMM Strategies and Use Cases (Meteora Documentation)
- Automated Market Making and Loss-Versus-Rebalancing (Milionis et al., 2022)
- Automated Market Making and Arbitrage Profits in the Presence of Fees (Milionis et al., 2023)
- Risks and Returns of Uniswap V3 Liquidity Providers (Heimbach et al., 2022)
- DeFi risks and the decentralisation illusion (Aramonte et al., BIS Quarterly Review, 2021)
Frequently asked questions
What bin step should I use on Meteora DLMM?
You do not set the bin step yourself; it is fixed when a pool is created, so you choose between pools. Match the step to how far the pair usually moves between trades. Pegged pairs tend to sit at 1 basis point, liquid majors such as SOL/USDC trade in pools from about 1 to 20, and new or thin tokens often use 50 to 200.
Which Meteora liquidity shape is best for a volatile pair?
None dominates. Spot spreads liquidity evenly across the chosen bins and tolerates being wrong about direction. Curve concentrates around the active bin and earns more while price stays put, but goes out of range sooner. Bid-ask puts weight at the edges and behaves like a set of scaled limit orders rather than passive market making.
Does Meteora DLMM have impermanent loss?
Yes. Bins convert into the other token as price crosses them, much as ticks do on a concentrated liquidity pool, so a directional move leaves the position holding more of the weaker token than simply holding would. The bin structure changes the step size of the conversion, not its economics.
What is the volatility accumulator on Meteora?
A counter, kept by the pool, of how far price has recently moved across bins. It decays after a quiet spell and resets after a longer one. Its value adds a variable fee on top of the base rate, so the fee rises when the pool is most likely to be quoting a stale price, up to a hard cap of 10%.
When does a Meteora DLMM position stop earning?
When price leaves the bins you funded. A swap pays fees only to the bins it trades through, so liquidity in bins that price never reaches earns nothing. The position stays open and starts earning again if price comes back or you move it.
Continue in this track
This is guide 15 of 17 in LP Mechanics.
Next: Raydium Liquidity Pools: CLMM, CPMM and Choosing Between Them →
Previous: ← DLMM Explained: Bin-Based Liquidity, Dynamic Fees and Meteora
See the full track sequence, or browse all 59 guides.