Every pool is a rule that turns what it holds into a price. The rule decides how much depth sits near the market, how fast your holdings flip from one token to the other, and which failure you are being paid to absorb.
So picking a pool is really picking a rule, and the right rule depends on how the pair behaves. A pair that barely moves wants a different shape from one that moves 4% a day.
This guide runs through six families by what they are built for, not by brand. By the end you can match a pair to a family and say which failure you are accepting.
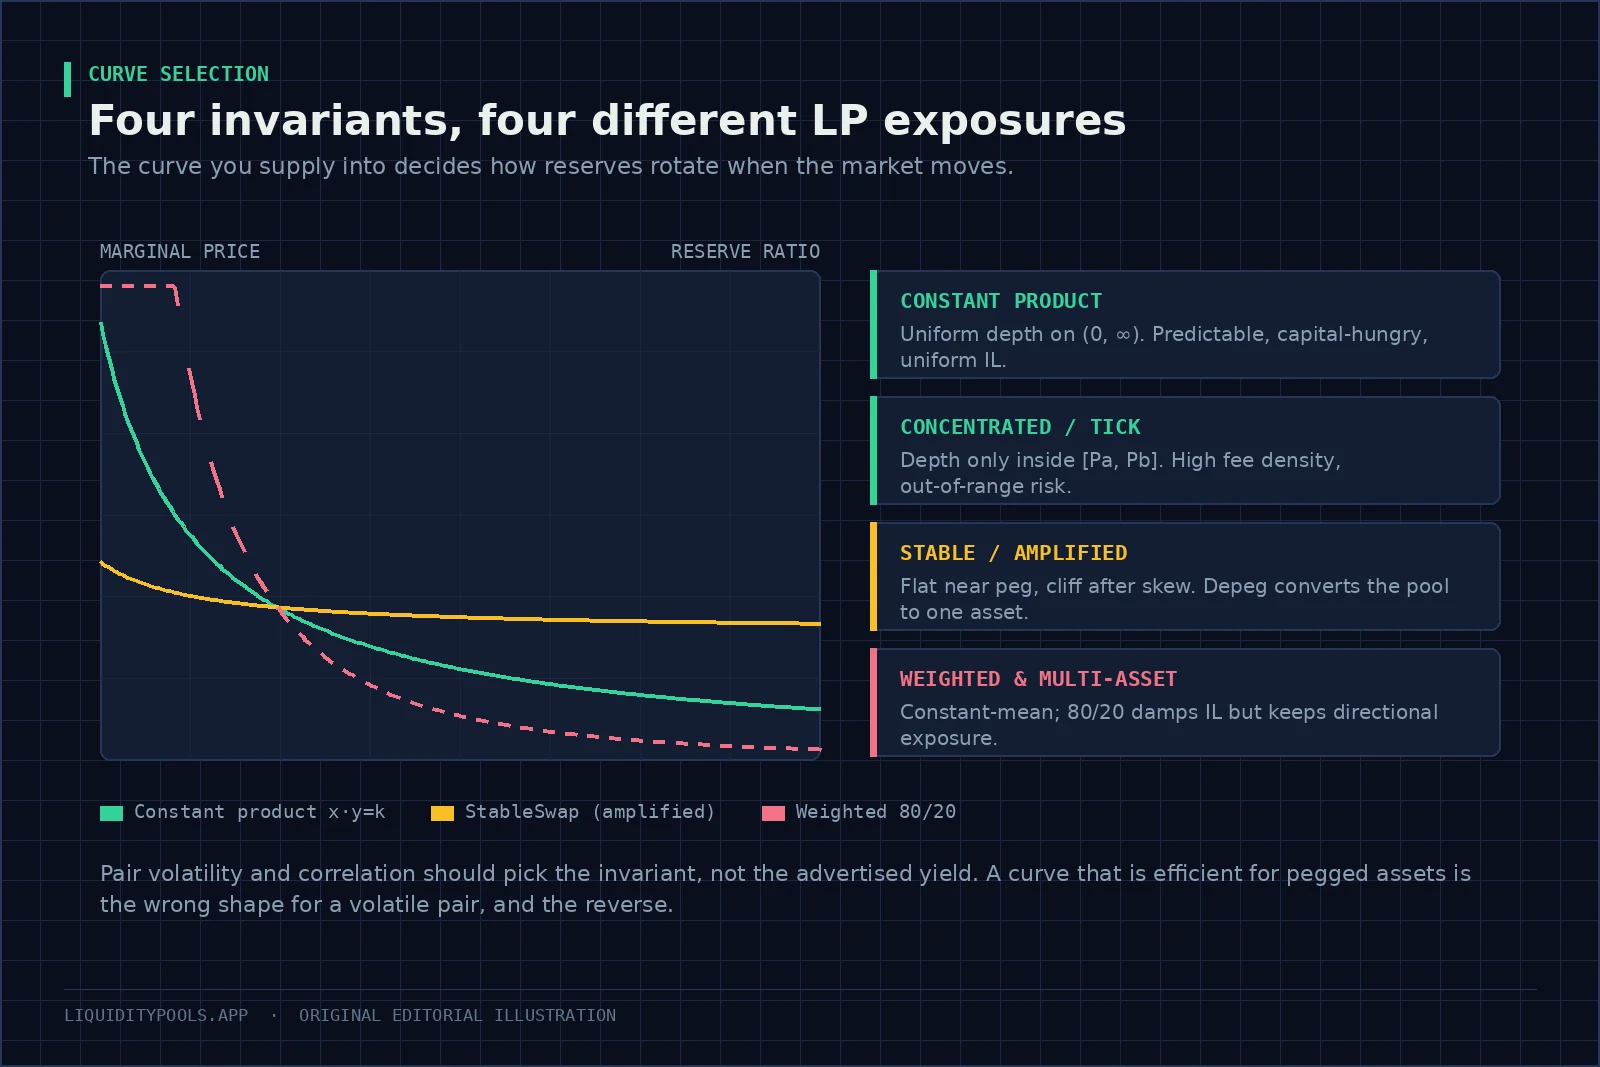
Key point: A disappointing outcome is not always bad luck; it can be the wrong curve. Closely correlated assets need a curve that concentrates liquidity near their expected exchange rate. An ordinary constant-product curve spreads capital across prices the pair may never reach, which lowers the fees each dollar earns.
The six families at a glance
| Family | Built for | What you give up | How it fails |
|---|---|---|---|
| Full range | Anything, with no attention | Most of your money sits far from the price | Ordinary divergence from holding |
| Chosen range | Earning much more per dollar | It needs watching | Price leaves, you earn nothing |
| Flat stable curve | Pairs meant to hold a ratio | Almost nothing, until the ratio breaks | You absorb the broken token |
| Weighted | Keeping exposure to one token | Depth on the light side | Concentrated in whatever you weighted |
| Stepped bins | Precise control over placement | Active management | A fast move skips empty steps |
| Lending | A different instrument | No swap fees at all | Bad debt and withdrawal limits |
Researchers group the first five by the shape of their pricing rule, and the same framework compares how far each one falls behind holding[6].
Full range: nothing to manage, most of it idle
The original design keeps the two balances multiplied together at a fixed number, across every price from zero upward[1]. The pool can quote at any price, and trading alone can never empty it.
What it does well. Nothing to manage, never goes out of range. You can leave it alone.
What it costs. Most of your money backs prices far from where the pair trades. That part earns little.
Who it suits. Passive positions, unpredictable pairs, and anyone who will not monitor a range. See Constant Product Formula.
Chosen range: more fees, more attention
Range-based pools let you set two prices and put all your money between them[2]. The narrower the band, the more each dollar earns while the price stays inside it.
What it does well. Higher fee income per dollar. A band of 4% either side of the price provides the same depth as about fifty times as much money spread across the full range[2]. While the price stays inside, each dollar earns about fifty times the fees.
What it costs. Your attention, and all fee income the moment the price leaves. Out of range you earn nothing and hold only the token that fell.
Who it suits. Pairs where you have a view on the range, and people who will check on it. See Concentrated Liquidity Explained and Out-of-Range Liquidity.
Flat stable curves: cheap to trade, until a peg breaks
For pairs meant to trade at a fixed ratio, the curve is nearly flat around that ratio and steepens as the balances skew[3]. Research on curve shape shows why: a low-curvature curve suits coins whose value is roughly fixed, while a more curved one protects providers when traders know more than the pool[7].
What it does well. Large trades at very low cost near the peg. That is why it is the standard design for stablecoin pairs[3].
What it costs. A rare and severe tail. If one token breaks its peg, the flat part means the pool keeps buying it at close to full price until the healthy side is nearly gone. In a pool of three or more pegged tokens, one broken token can drain all the healthy ones the same way.
Who it suits. Fiat stablecoin pairs, staked-ETH tokens against ETH, wrapped versions of the same asset. See Stablecoin Liquidity Pools.
Weighted: keeping the exposure you wanted
Rather than an even split, you choose the proportions. An 80/20 pool holds 80% of its value in one token while still quoting both[5].
Where:
- is how much of token the pool holds.
- is that token’s share of value, and all the weights add up to 1.
- is the number the pool keeps level.
The consequence is what matters. Less of the position rotates for a given price move, so you fall less far behind holding, and you keep more exposure to the heavy token.
What it costs. Thin depth on the light side, so a large exit moves the price further, and routers may send flow to deeper pools.
Who it suits. Treasuries, long-term holders, and token launches where a project has no large pile of the quote asset. See Balancer Weighted Pools, and for the version that follows a moving price automatically, Curve v2 Explained.
Stepped bins: placing money exactly where you want it
Bin designs quote one fixed price per step, so a trade inside a step pays no price impact — the cost of your own order moving the rate — and the price moves in jumps between steps[4]. You decide how much goes in each step.
What it does well. Real control. You can build shapes a single band cannot express, including one-sided ladders that work like limit orders[4].
What it costs. A fast move can jump through empty steps, and shapes need managing.
Who it suits. Anyone running a position actively. See DLMM Explained.
Lending pools share the word and nothing else
The confusion causes real mistakes, so it is worth stating plainly. You deposit one token, somebody borrows it against collateral, and you earn interest set by how much is borrowed[8]. No price quoting, no rotation, no divergence.
| Liquidity pool | Lending pool | |
|---|---|---|
| What you put in | Two or more tokens, in ratio | One token |
| Where income comes from | Swap fees | Borrower interest |
| Main risk | Divergence, and faster traders | Bad debt, price feed failure, liquidations |
| What limits it | Depth at the traded price | How much is already borrowed |
| Getting out | Any block | Blocked while everything is lent out |
Both are legitimate. Treating one as a safer version of the other leads to the wrong position size and the wrong things to watch. Lending Pool vs Liquidity Pool compares them properly.
The same deposit, four ways
Put $25,000 into an ETH/USDC pair and hold it while ETH rises 35%. Each shortfall is measured against holding the tokens you started with, before fees.
| Structure | Shortfall against holding | Fee income | What you hold at the end |
|---|---|---|---|
| Full range | about -1.1% | Low | Both tokens, less ETH than before |
| Chosen range, plus or minus 10% | about -12.3% | High, but only until ETH passes the top of the band | All USDC, sold on the way to the top |
| 80/20 weighted toward ETH | about -0.7% | Low to moderate | Mostly ETH |
| Pegged-pair curve, wrong fit | about -12.6% | Little once the balances skew | About 95% USDC |
None of these is a forecast. Each shortfall follows from the rule and the price move. The narrow band sold its last ETH at the top edge, 10% above the start, and the rally ran another 25 percentage points without it.
The last row assumes a stable curve set at ETH’s starting price, with an amplification of 100 — the setting that controls how flat the curve is. Because the curve barely moves its price, arbitrage buys almost all of your ETH near the old price. It is a quiet mistake on the way in and an expensive one when the pair moves.
The same curve appears under many names
Branding hides how much overlap there is. A range-based pool on one chain and a fork of it on another are the same rule with different step sizes and tiers. A flat stable curve appears under several names with different default settings. PancakeSwap’s v3 pools are a direct example of the first kind — the same range-based rule as Uniswap v3 with their own tiers — mapped out in PancakeSwap Liquidity Pools.
So the questions transfer. Whatever it is called, ask which rule prices the trades, what the settings are, where the curve is flat and where it bends, and what you hold at each extreme. Bonding Curves and AMM Invariants shows how to read any of these rules.
The one thing branding does tell you is maturity. The same mathematics in an unaudited fork, with somebody holding a key over the fee setting, is a different risk from a long-lived deployment with immutable contracts. Read the rule to understand the exposure. Read the deployment to understand who you are trusting.
How to pick
- Classify the pair first. Pegged, correlated, or independent. That alone rules out most curves.
- Look at how it has actually moved over one to three months.
- Pick the rule that puts depth where the pair trades. That is the core decision.
- If it is range-based, size the band to the volatility, not to a yield you would like.
- Check where the volume actually goes. A well-chosen curve with no flow earns nothing.
- Name the failure you are accepting. Out of range, peg absorption, or gapping.
- Check the specific deployment, not the family. Audits and admin keys are per contract.
A tighter range is not a better pool; it is the same pool with more of your money exposed to the price leaving. The useful question is which pricing rule you want quoting on your behalf when this particular pair moves.
Where to go next
Once the curve is chosen, size the position with the liquidity pool fee and APR calculator and check impermanent loss — how far a pool position trails simply holding — with the impermanent loss calculator. If you hold only one of the two tokens, Single-Sided Liquidity covers the options before you pick a curve.
References
- Uniswap v2 Core (Adams et al., 2020)
- Uniswap v3 Core (Adams et al., 2021)
- StableSwap - efficient mechanism for Stablecoin liquidity (Egorov, 2019)
- Liquidity Book DLMM: Primer (LFJ Documentation)
- Balancer Whitepaper: A non-custodial portfolio manager, liquidity provider, and price sensor (Martinelli & Mushegian, 2019)
- SoK: Decentralized Exchanges (DEX) with Automated Market Maker (AMM) Protocols (Xu et al., 2021)
- When does the tail wag the dog? Curvature and market making (Angeris et al., 2020)
- DeFi lending: intermediation without information? (BIS Bulletin No 57, 2022)
Frequently asked questions
What are the main types of liquidity pools?
Constant-product pools spanning all prices, concentrated liquidity pools that restrict depth to a chosen range, amplified stable pools for pegged assets, weighted multi-asset pools, discrete bin pools that quote in fixed steps, and lending pools, which are a different instrument that shares the name.
Which liquidity pool type is best for stablecoins?
An amplified stable curve, because it holds price near the peg with very low slippage for the bulk of trading. The trade-off is that the same flatness causes the pool to absorb large quantities of an asset that is depegging before price impact rises meaningfully.
What is the difference between a lending pool and a liquidity pool?
A lending pool matches suppliers with borrowers and pays interest set by a utilisation curve, with no automated price quoting and no divergence loss. A liquidity pool quotes prices for swaps from its reserves, so the supplier is short volatility rather than long a credit exposure.
Do 80/20 weighted pools reduce impermanent loss?
They reduce it relative to a 50/50 pool for the same price move, because less of the portfolio rotates. They do not eliminate it, and they leave the position with more concentrated directional exposure to the heavier asset.
Continue in this track
This is guide 9 of 14 in Foundations.
Next: Lending Pool vs Liquidity Pool: Two Different Instruments →
Previous: ← Liquidity Pool Tokens Explained: What an LP Position Represents
See the full track sequence, or browse all 59 guides.